Installation Guide – Concrete Wet-Pour
Concrete Wet-Pour – Expansion & Crack Control
1. Set and brace the HIDE frame
Position and level the frame at the required finished height and fix it so it cannot move. Fit the Inlay Lid or tight timber spreaders in the opening before pouring and leave them in until the concrete has set. Wet concrete will bow an unbraced frame.
2. Apply expansion foam
Wrap 10 mm closed-cell expansion foam around the full outside perimeter of the frame, flush with the top edge, and tape the ends.
3. Pour concrete
Pour and finish the concrete against the foam. Never pour concrete directly against the stainless steel frame. Do not screed off the top rim.
4. Finish the joint
Once cured, recess the top of the foam and finish with a flexible polyurethane exterior sealant.
5. Control cracking
Provide control joints and/or reinforcement around the opening as required by the slab design. As a minimum, HIDE recommends a saw-cut joint from each corner of the frame to the nearest joint or edge within 48 hours of the pour.
Before leaving site: the Inlay Lid must drop in freely by hand.
IMPORTANT: The HIDE frame is a rigid penetration. Concrete poured hard against it will compress the frame and the lid will no longer fit. Appropriate isolation and crack control must be provided in the surrounding concrete. Frames damaged by slab movement are not covered by warranty.
Why expansion control matters
Concrete shrinks as it cures, then expands and contracts with heat and moisture for the life of the slab. A square opening in a slab concentrates that movement at its corners, and a thin stainless frame set into the opening is the softest thing in the deck. If the slab is poured hard against the Edge Protector, the concrete pushes the rails inward, the opening goes out of square, and the Inlay Lid no longer fits. Concrete in compression is far stronger than any stainless frame can resist, so the only defence is to give the slab room to move: a compressible strip around the frame, bracing while the concrete is wet, and control joints that tell the slab where to crack.
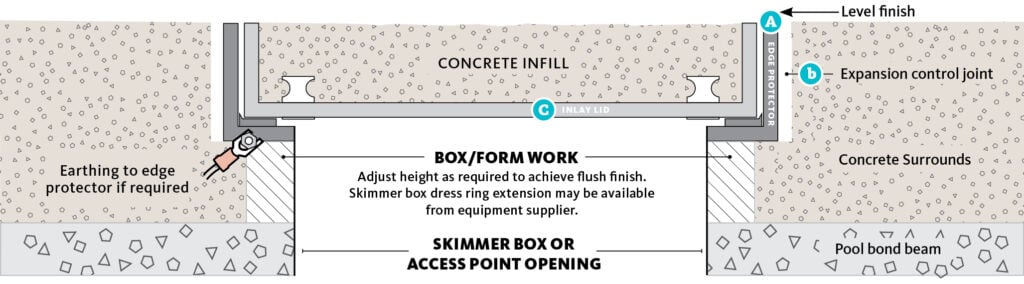
CROSS SECTION OF A COMPLETED INSTALLATION
Before you start
In the kit
- Edge Protector (A) – 316L marine-grade stainless steel
- Inlay Lid (C) – 316L stainless steel tray with two safety keyways
- 4 × polymer twist-in lugs and 2 × key slot formers – item code CONPARTS
- 2 × Safety Keys
- HIDE Care & Maintenance sheet for the homeowner
Supplied by the installer
- 10 mm closed-cell foam expansion strip (e.g. Abelflex) – approx. 2 m per frame
- Flexible polyurethane exterior joint sealant (e.g. Sikaflex PRO or equivalent) and foam backer rod
- Timber spreader blocks, if the Inlay Lid will not be used to brace the frame
- Robust, non-staining masking tape or film
- Petroleum-based or non-stick release coating
- Tape measure, spirit level, string line, diamond blade
Safety
The Inlay Lid is heavy. Lifting is a two-handed vertical lift by an adult only – support your back and do not lift beyond your limits. Fit a secure temporary cover over the skimmer opening whenever the lid is out and the area is unattended. Never leave the Safety Keys in the lid. Bonding (earthing) rules may apply in a pool area – see Step 4.
Step 1 – Check the fit and mark the frame
1. Dry-fit the Inlay Lid (C) in the Edge Protector (A) on a flat surface. It should drop in freely with an even gap of approx. 3 mm all round.
2. Measure both diagonals of the Edge Protector, corner to corner. They should match within 1 mm.
3. Write both measurements on the frame with a marker. You will check them again after the pour.
4. If the lid is tight or the diagonals do not match before installation, stop and contact HIDE.
Step 2 – Establish the finished height and set the frame
Calculate the boxing or formwork required so the top rim of the installed Edge Protector (A) finishes flush with the surrounding surface. Allow for any topping, paving, grinding or sealing that will alter the final concrete height. A skimmer box dress-ring extension may be available from your equipment supplier if extra height is needed.
Set the Edge Protector over the skimmer box so the opening is centred on the skimmer. Level it in both directions, square it to the pool coping and check the diagonals again. Support it from the slab on chairs, pins or mortar dabs under the corners, and fix it so it cannot move during the pour. Do not rest the frame on the skimmer box or pool shell – on a fibreglass pool the shell and the deck move independently.
Step 3 – Expansion foam and bracing
1. Wrap 10 mm closed-cell foam expansion strip (b) around all four outer faces of the Edge Protector, flush with the top edge. Tape the ends so it cannot slip down when concrete is placed against it.
2. Mask the top rim and inside faces of the Edge Protector with non-staining tape.
3. Fit the Inlay Lid (C), or tight timber spreaders, in the opening. Wet concrete pushes inward with real force and this is what keeps the frame square while the slab sets.
If you are bracing with the Inlay Lid, fill the lid after the slab has set (Step 5). If you are bracing with spreaders, the lid can be filled at the same time as the slab.
Step 4 – Bonding (earthing)
HIDE products are made of 316L stainless steel and are conductive. The installer is responsible for bonding. The Edge Protector provides attachment points for bonding devices, if required. Regulations vary – check with your local authority to ensure the installation meets electrical safety requirements before the pour covers the attachment points.
Step 5 – Prepare and fill the Inlay Lid
1. Snap the two key slot formers (d) into the Inlay Lid. Hook the internal edge first, then push the spring end down to lock against the wall.
2. Twist in the four polymer lugs (e), set to suit the concrete depth: 40, 50 or 60 mm.
3. Place the Inlay Lid (C) face-up on a flat surface, away from the slab pour area, and apply a petroleum-based or non-stick coating to the outside of the tray.
4. Fill with the same concrete mix being poured around the skimmer box for a seamless finish. Allow for any grinding, honing or sealing that will alter the finished height.
Step 6 – The pour
1. Pour and screed the concrete up to the foam strip. Never pour concrete directly against the stainless steel frame.
2. Use the Edge Protector as a level guide only. Do not run a screed board or bull float hard across the top rim.
3. Leave the Inlay Lid or spreaders in place until the concrete has set hard (minimum 24 hours).
4. Clean any concrete residue from the exposed stainless as soon as possible with clean fresh water and a soft cloth.
Step 7 – After the pour
1. Remove the lid or spreaders and peel off the masking tape.
2. Check the diagonals against the marks from Step 1. They should still match within 1–2 mm.
3. Fit the Inlay Lid. It should drop in freely by hand with an even gap all round.
4. Within 48 hours, saw-cut a control joint from each corner of the Edge Protector to the nearest joint or slab edge. A square opening will always crack at its corners – this gives the crack a straight line to follow.
Step 8 – Grinding, honing and polishing
HIDE does not install or supervise on-site works. The following are general recommendations; installers must follow relevant standards, site safety procedures and their own trade best practice.
- Lift the Inlay Lid out with the Safety Keys before any machine work and store it away from the work area. Fit a secure temporary cover over the opening to prevent falls and slurry entering the skimmer box.
- Tape over the exposed top and inner faces of the Edge Protector with robust, non-staining tape or film.
- Stop machine polishing a short distance from the Edge Protector and finish the last strip of concrete by hand – diamond hand pads, rubbing stones, wet-and-dry.
- Polish the Inlay Lid by hand only. Never machine-polish over stainless.
- Do not let any exposed metal part of a grinder or polisher touch the stainless. Carbon steel contamination will rust and stain 316L.
- Use only non-ferrous tools on stainless: no steel wool, carbon steel scrapers, chisels or wire brushes. Use plastic or timber tools, or abrasives that have never been used on carbon steel.
- During and after polishing, wash, rinse and vacuum or blow out the recess so no slurry or metal dust is trapped.
WARNING – ACID AND CHEMICAL WASHES
Never allow acid or strong chemical cleaners to contact HIDE stainless components. If the surrounding concrete is to be acid or chemically washed, remove the Inlay Lid and fully mask the Edge Protector first. Apply a water-resistant lubricant to any stainless that could be exposed, and immediately rinse all HIDE components thoroughly with clean water when finished.
Step 9 – Finish the expansion joint
Once the slab has cured (ideally 28 days, minimum 7), recess the top of the foam about 10 mm below the surface, push in a foam backer rod and finish with a flexible polyurethane exterior sealant flush with the deck. The sealant keeps water and grit out of the joint while still allowing the slab to move. Do not fill the gap with mortar or rigid grout.
Step 10 – Hand over
• Show the homeowner how to open and close the lid: insert both Safety Keys, turn to 90° so they lock into the back of the lid, lift vertically just enough to clear the recess, and set aside. Reverse to close, then remove the keys.
• Pass the Safety Keys to the homeowner to store securely, away from the cover and out of reach of children. Never leave the keys in the lid – it allows children to access the skimmer box.
• Give the homeowner the HIDE Care & Maintenance sheet. Stainless should be rinsed and wiped regularly with clean fresh water to remove dust, salts and pool chemicals.
Check before you leave site
• Diagonals match the marks made in Step 1 (within 1–2 mm)
• Inlay Lid drops in freely by hand with an even gap all round
• Foam expansion strip visible on all four sides of the Edge Protector
• Control joints cut from all four corners
• Stainless cleaned – no concrete residue, no tape left behind
• Safety Keys handed to the homeowner, not left in the lid
Need help?
Stop and contact us before pouring or forcing anything.
HIDE / Skimmer Lids
P: +61 7 3807 2551
E: admin@skimmerlids.com.au
Australia: skimmerlids.com.au
USA/Canada: skimmercovers.com
Europe: hidecovers.com